How To Conduct A Proper Boil?

The Purpose of Boiling
Sterilization
Isomerization of Hops
Protein Coagulation
Volatilization of Unwanted Compounds
Maillard Reactions
Concentration of Wort

Equipment Needed for Boiling
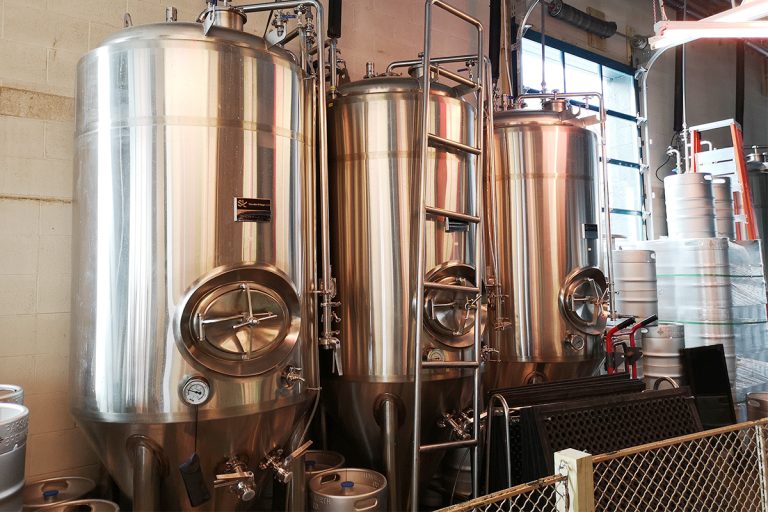
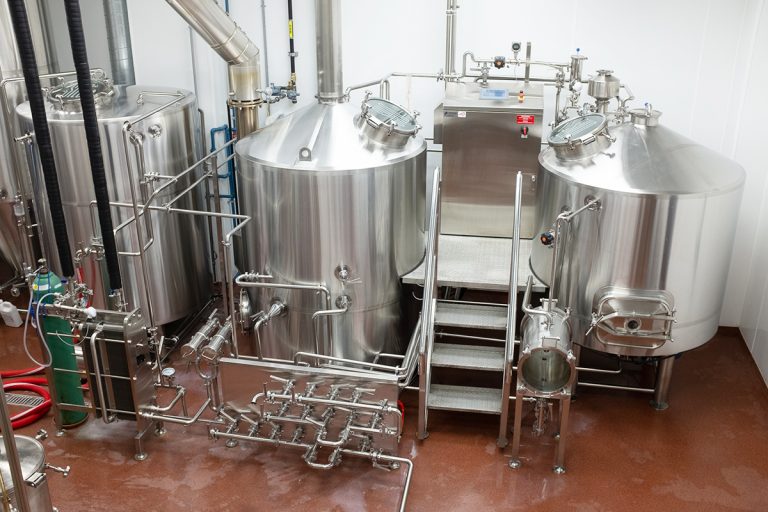
Brew Kettle
The brew kettle is the centerpiece of the boiling process. It is a large pot where the wort is heated to a boil. When selecting a brew kettle, consider the following factors:
- Size: Choose a kettle with a capacity that accommodates your batch size. It should be large enough to prevent boil-overs, typically at least 25-50% larger than your batch volume.
- Material: Stainless steel is the preferred material for brew kettles due to its durability, resistance to corrosion, and ease of cleaning. It does not react with wort components, ensuring the beer’s flavor remains untainted.
Heat Source
A reliable heat source can bring the wort to a boil and maintain a consistent boil throughout the process. The choice of heat source depends on your brewing setup:
- Gas Burners: Propane or natural gas burners provide strong, adjustable heat and are widely used in homebrewing and commercial setups. They offer rapid heating and precise control, making them ideal for achieving a vigorous boil. Ensure the burner is rated for the kettle size to avoid under or over-heating.
- Electric Heating Elements: Electric elements are convenient for indoor brewing and offer precise temperature control. They are often integrated into electric brew kettles or used as immersion heaters. When using electric elements, ensure they are compatible with your kettle and provide sufficient power for your batch size.
- Direct Fire Heating Elements: Direct fire heating elements are placed underneath the brew kettle to heat the kettle. These elements have a simpler design and are very efficient. They are commonly used in medium to large commercial brewing systems. Proper maintenance and calibration of these elements will avoid hot spots and ensure even heating.
Thermometer
Accurate temperature monitoring is essential during the boiling process to ensure the wort reaches and maintains the desired boiling point. There are several types of thermometers suitable for brewing:
- Dial Thermometers: These analog thermometers are easy to read and can be mounted directly on the brew kettle. Look for models with a long probe and calibration features.
- Digital Thermometers: Digital thermometers offer fast and precise temperature readings. Some models come with a probe that can be inserted into the wort, while others are handheld with a probe wire. Digital thermometers often have additional features like timers and alarms.
- Infrared Thermometers: These non-contact thermometers allow you to measure the wort’s surface temperature quickly. While convenient, they may not provide as accurate readings as probes immersed in the wort.
Stirring Paddle
The stirring paddle ensures even heat distribution, prevents scorching, and helps integrate hop additions:
- Material: Stirring paddles are typically made from food-grade plastic, stainless steel, or wood. Stainless steel paddles are durable and easy to sanitize, while plastic paddles are lightweight and inexpensive. Wood paddles are traditional but can be harder to sanitize thoroughly.
- Length and Design: Choose a paddle long enough to reach the bottom of your brew kettle without risking burns. A paddle with a slotted design or holes can help break up clumps and promote better mixing.
- Ergonomics: Look for paddles with comfortable grips and sturdy construction to make stirring easier and more efficient.

Preparing for the Boil
Measure Ingredients
Accurately measuring ingredients can help achieve the desired flavor, aroma, and bitterness of your beer. Here’s how to measure your ingredients properly:
- Malt Extracts: Whether using liquid or dry malt extracts, weigh them accurately according to your recipe. For liquid extracts, it’s often helpful to warm the container in hot water to make pouring easier and more precise.
- Hops: Use a digital scale to measure hops accurately. Hops are typically added at various stages during the boil, so organize them in separate containers labeled with the addition times (e.g., 60 minutes, 30 minutes, 10 minutes).
- Adjuncts and Additives: If your recipe includes adjuncts (such as sugars or flavorings) or additives (such as Irish moss for clarifying), measure these and set them aside, ready for their specific addition times.
- Water: Ensure you have the correct volume of water in your brew kettle. Account for the water lost during boiling due to evaporation, typically around 10-15% of the total volume per hour.
Sanitize Equipment
Sanitizing prevents contamination from ruining your beer. While the boiling process itself sanitizes the wort, it is also important to sanitize any equipment that comes in contact with the wort after boiling. Here’s how to properly sanitize brewery equipment:
- Cleaning: Before sanitizing, clean all equipment thoroughly to remove any dirt or residue. Use a dedicated brewing cleaner that doesn’t leave residues, such as PBW (Powdered Brewery Wash).
- Sanitizing: Use a no-rinse sanitizer like Star San or Iodophor to sanitize your equipment. Follow the manufacturer’s instructions for dilution and contact time. Key items to sanitize include:
- Fermentation Tanks: Ensure your fermentation tank and any associated parts (airlocks, stoppers, lids) are sanitized.
- Transfer Tubing and Siphons: Anything used to transfer the wort from the kettle to the fermenter should be sanitized.
- Thermometers and Hydrometers: Any tools used to measure the wort temperature or gravity post-boil should be sanitized.
- Stirring Paddle: Although the paddle will be used during the boil, it’s good practice to sanitize it if it will contact the wort post-boil.
Set Up Your Workspace
A well-organized workspace helps ensure a smooth and efficient boiling process. Here’s how to set up your brewing area:
- Arrange Equipment: Position your brew kettle on a stable, heat-resistant surface near your heat source. Ensure your heat source is securely set up, whether it’s a gas burner, electric element, or induction cooktop.
- Prepare Ingredients: Place all measured ingredients within easy reach. Arrange them in the order they will be added to the boil to avoid any confusion or delays. Label containers with the additional times to keep track easily.
- Tools and Accessories: Ensure all necessary tools (thermometer, stirring paddle, measuring spoons) are clean, sanitized if necessary, and within reach.
- Safety Precautions: Ensure you have proper ventilation if using gas burners. Keep a fire extinguisher nearby and be aware of any potential hazards related to your heat source.
- Documentation: Have your recipe and brewing notes accessible. Keeping a brewing log helps track your process and any adjustments made during the boil.

Conducting the Boil
Bringing the Wort to a Boil
- Heat the Wort: Once you’ve transferred your wort to the brew kettle, apply heat using your chosen heat source (gas burner, electric heating element, or direct fire heating element). Start with moderate heat to gradually bring the wort to a boil. This helps prevent scorching and allows you to monitor the process closely.
- Monitor Temperature: Use a thermometer to monitor the wort’s temperature as it heats. You’ll observe a gradual increase until it reaches the boiling point, which is typically around 212°F (100°C) at sea level. The boiling point may vary slightly depending on your altitude.
- Hot Break: As the wort approaches boiling, proteins, and other compounds will coagulate, causing foam to form and rise. This stage is known as the “hot break.” Be vigilant to prevent boil-overs by reducing the heat slightly or using a spray bottle of water to dissipate the foam. Stirring the wort gently can also help manage the foam.
- Achieve a Rolling Boil: Once the hot break subsides, increase the heat to achieve a rolling boil. Rolling boiling involves vigorous bubbling and movement of the wort, which allows for the correct isomerization of hop acids and ensures the evaporation of unwanted compounds.
Boiling Duration
- Standard Boil Time: Most beer recipes call for a boil duration of 60 minutes. However, some styles or specific recipes may require longer or shorter boiling times, typically ranging from 60 to 90 minutes. Longer boils can increase the concentration of flavors and bitterness, while shorter boils may retain more delicate hop aromas.
- Maintain Consistency: Throughout the boil, maintain a consistent rolling boil. Avoid excessive boiling, which can lead to increased evaporation rates, excessive caramelization, or unwanted off-flavors. Adjust the heat as needed to keep the boil steady.
- Monitor Evaporation: Be aware that water will evaporate during the boil, usually around 10-15% of the total volume per hour. This evaporation helps concentrate the wort but may require you to top off with additional water if necessary to reach your desired final volume.
Hop Additions
Hop additions are a crucial part of the boiling process, contributing to the bitterness, flavor, and aroma of the beer. The timing of hop additions during the boil determines their impact on the final product.
- Bittering Hops: Add bittering hops at the start of the boil. These hops will boil for the full duration (typically 60 minutes) and primarily contribute bitterness to the beer. The alpha acids in the hops are isomerized during the boil, which creates the bitter compounds that balance the sweetness of the malt.
- Flavor Hops: Midway through the boil, usually with 15-30 minutes remaining, add flavor hops. These hops contribute both bitterness and flavor. The shorter boil time preserves more of the hop’s essential oils, which impart distinct hop flavors to the beer.
- Aroma Hops: In the last 5-10 minutes of the boil, add aroma hops. These hops are primarily intended to impart hop aroma rather than bitterness. Adding them late in the boil helps retain their volatile aromatic compounds, which would otherwise be driven off by longer boiling times.
- Special Additions: Some recipes may call for additional ingredients like spices, fruit, or other flavorings. These are typically added during the last 5-10 minutes of the boil or even at flameout to preserve their delicate flavors and aromas.
- Hop Utilization: Keep in mind that hop utilization (the efficiency with which alpha acids are isomerized) varies with boil time, wort gravity, and pH. Adjust your hop additions based on these factors to achieve the desired bitterness, flavor, and aroma.

Managing the Boil
Boil Intensity
- Achieving a Rolling Boil: The goal during the boil is to maintain a rolling boil, where the wort bubbles vigorously and moves continuously. This strength enables the correct isomerization of hop acids, which are responsible for beer’s bitter taste.
- Avoiding Excessive Boiling: While a vigorous boil is necessary, boiling too intensely can lead to excessive evaporation, increased caramelization, and potential off-flavors. It can also cause a boil-over, wasting valuable wort and making a mess. Adjust the heat to maintain a steady, controlled rolling boil rather than an overly aggressive one.
- Hot Break Management: During the initial phase of the boil, proteins and other compounds coagulate and form foam, known as the hot break. Managing this foam can prevent boil-over. Reduce the heat slightly if the foam rises too quickly, or use a spray bottle with water to break it up. Stirring gently can also help control foam formation.
Monitoring Temperature
- Consistent Temperature: Maintaining a consistent temperature is key to ensuring a successful boil. The boiling point of wort is typically around 212°F (100°C) at sea level, but this can vary with altitude. Use a reliable thermometer to monitor the temperature throughout the boil.
- Thermometer Placement: Position the thermometer properly to get an accurate reading. If using a dial thermometer mounted on the kettle, ensure it’s calibrated correctly and positioned so it reads the temperature of the liquid, not just the surface or near the heat source. For digital thermometers with probes, immerse the probe in the center of the wort.
- Adjusting Heat: Be prepared to adjust the heat source to maintain the rolling boil. Factors such as kettle size, ambient temperature, and wort volume can influence how much heat is needed. Continuously monitor and tweak the heat as necessary to keep the boil consistent without becoming too aggressive.
Evaporation Rate
- Understanding Evaporation: During the boil, water evaporates from the wort, concentrating the sugars and flavors. A typical evaporation rate is around 10-15% of the total volume per hour. This rate can vary based on boil intensity, kettle shape, and environmental conditions.
- Managing Evaporation: To achieve the desired wort concentration and gravity, it’s essential to manage the evaporation rate. Maintain a steady rolling boil to ensure consistent evaporation. Be mindful of boil duration, longer boils increase evaporation and concentrate the wort further.
- Measuring and Adjusting: Measure the pre-boil and post-boil wort volumes to calculate the actual evaporation rate. If the evaporation rate is too high, you might need to add water to reach the desired final volume and gravity. Conversely, if the rate is too low, you can extend the boil slightly to achieve the target concentration.
- Lid Management: Leaving the kettle lid open during boiling allows volatile compounds, such as dimethyl sulfide (DMS), to escape. Covering the kettle may trap these compounds, causing odors. If you need to control excessive evaporation, you can partially cover the kettle, but make sure there is adequate ventilation.

Post-Boil Considerations
Whirlpool
Whirlpooling is a technique used after the boil to help separate solid particles, such as hop matter and protein coagulates (trub), from the liquid wort. This process enhances wort clarity and prepares it for efficient cooling and fermentation.
- Creating a Whirlpool: After turning off the heat, use a sanitized stirring paddle or a whirlpool arm to create a vigorous circular motion in the wort. Stir in one direction to generate a whirlpool effect. The whirlpool causes solid particles to gather in the center of the kettle as the wort moves outward and then inward in a circular motion.
- Settling Time: Allow the whirlpool to spin down naturally. This typically takes about 15-20 minutes. During this time, the trub and hop particles will settle into a cone-shaped pile at the center of the kettle, leaving clearer wort around the edges.
- Trub Separation: Once the whirlpool has settled, carefully siphon or pump the clear wort from the side of the kettle, avoiding the trub pile in the center. This helps ensure that only clean wort is transferred to the fermentation tank, improving the overall quality and clarity of the final beer.
Cooling
Cooling the wort quickly after boiling prevents contamination and prepares it for pitching yeast. Cooling the wort quickly also helps reduce the formation of unwanted compounds and improves the overall stability of the beer.
- Immersion Chiller: An immersion chiller is a coil of stainless steel or copper tubing that is placed directly into the wort. Cold water is circulated through the chiller, absorbing heat from the wort and cooling it quickly. Here’s how to use it:
- Sanitize the Chiller: Place the chiller in the wort during the last 15 minutes of the boil to ensure it’s sanitized by the boiling wort.
- Connect to Water Source: After the boil, connect the chiller to a cold water source using appropriate hoses and fittings.
- Circulate Water: Turn on the cold water and circulate it through the chiller. Stir the wort gently to promote even cooling and reduce cooling time.
- Counterflow Chiller: A counterflow chiller consists of two concentric tubes, with hot wort flowing through the inner tube and cold water flowing in the opposite direction through the outer tube. This design allows for efficient heat exchange. Here’s how to use it:
- Sanitize the Chiller: Run hot wort through the chiller for a few minutes at the end of the boil to sanitize it.
- Connect to Water Source: Connect the chiller to a cold water source and the outlet of your brew kettle.
- Pump Wort Through: Use a pump to transfer hot wort through the chiller while cold water flows in the opposite direction. The wort will be cooled as it exits the chiller and can be directly transferred to the fermentation tank.
- Plate Chiller: A plate chiller consists of multiple metal plates stacked together, creating thin channels for hot wort and cold water to flow through in opposite directions. This design maximizes surface area for rapid cooling. Here’s how to use it:
- Sanitize the Chiller: Run hot wort through the chiller to sanitize it.
- Connect to Water Source: Connect the chiller to a cold water source and the outlet of your brew kettle.
- Transfer Wort: Use a pump to transfer hot wort through the plate chiller while cold water flows through the other channels. The wort is quickly cooled and can be directed to the fermentation tank.

Troubleshooting Common Boiling Issues
Boil-Overs
Boil-overs occur when the wort foams up excessively and spills over the edge of the brew kettle. This not only creates a mess but also results in the loss of valuable wort and potential contamination. Here’s how to prevent and manage boil-overs:
- Monitor the Hot Break: The hot break is the stage during which proteins and other compounds coagulate, causing the wort to foam up. As the wort approaches boiling, keep a close eye on it and be ready to take action if the foam starts to rise rapidly.
- Control Heat Levels: Gradually increase the heat when bringing the wort to a boil to prevent sudden foaming. Once the wort reaches a rolling boil, adjust the heat to maintain a steady, controlled boil rather than an overly vigorous one.
- Stirring and Spraying: Stir the wort gently during the initial stages of boiling to break up the foam. You can also use a spray bottle filled with cold water to dissipate the foam. Be cautious not to introduce contaminants when doing this.
- Antifoam Agents: Consider using an antifoam agent, which can be added to the wort to reduce surface tension and prevent excessive foaming. Follow the manufacturer’s instructions for proper usage.
- Kettle Size: Ensure your brew kettle is large enough to accommodate the wort volume with ample headspace. A kettle that is too small increases the risk of boil-overs.
Hazy Beer
Hazy beer can result from several factors during the boil and can affect the beer’s appearance and stability. Here are some tips to address and prevent hazy beer:
- Protein Coagulation: Proper protein coagulation during the boil helps reduce haze. Achieve a good hot break by maintaining a rolling boil and stirring the wort periodically to help proteins coagulate and settle out.
- Use of Fining Agents: Adding fining agents like Irish moss or Whirlfloc tablets during the last 10-15 minutes of the boil can help clarify the wort by promoting the aggregation and settling of proteins and other particles.
- Whirlpooling: Conduct a whirlpool at the end of the boil to concentrate the trub in the center of the kettle. This step helps to separate the clear wort from the particulate matter, improving clarity.
- Rapid Cooling: Rapidly cooling the wort after the boil helps to form a cold break, where additional proteins and polyphenols precipitate out. Use an efficient cooling method, such as an immersion or counterflow chiller, to cool the wort quickly and promote clarity.
- Water Chemistry: Ensure your brewing water has the appropriate mineral content. High levels of certain minerals can contribute to haze. Use water analysis and adjust your water profile as needed to optimize clarity.
Off-Flavors
Off-flavors in beer can result from various issues during the boil. Addressing these potential issues can ensure a clean, flavorful final product. Here’s how to prevent and troubleshoot common off-flavors:
- Dimethyl Sulfide (DMS): DMS can impart a cooked corn or cabbage-like flavor to beer. It is naturally present in malt and can be driven off during the boil. To prevent DMS:
- Vigorous Boil: Ensure a vigorous, rolling boil to evaporate DMS effectively.
- Open Kettle: Keep the kettle uncovered during the boil to allow DMS to escape.
- Rapid Cooling: Cool the wort quickly after the boil to prevent DMS formation during the cooling phase.
- Astringency: Astringent flavors can result from excessive tannin extraction, often caused by over-boiling or high pH levels. To prevent astringency:
- Control Boil Duration: Avoid excessively long boils that can concentrate tannins.
- Monitor pH: Ensure the wort pH remains within the appropriate range (typically 5.0-5.5) during the mash and boil stages.
- Avoid Over-Sparging: Do not over-sparge grains, as this can extract tannins and lead to astringency.
- Oxidation: Oxidation can introduce stale or cardboard-like flavors to beer. To prevent oxidation:
- Minimize Aeration: Avoid splashing or introducing air into the hot wort, as oxygen is more readily absorbed at higher temperatures.
- Use a Closed System: When transferring hot wort, use closed systems and sanitized tubing to minimize oxygen exposure.
- Burnt or Caramelized Flavors: Scorching the wort can introduce burnt or overly caramelized flavors. To prevent this:
- Stir Regularly: Stir the wort frequently during the boil to prevent scorching on the bottom of the kettle.
- Control Heat: Use a heat source that provides even heating and adjust as necessary to maintain a steady boil without burning the wort.

Summary